Beyond Words Designs

I mentioned my new friend Stephanie a few weeks ago, after meeting her at Blissdom.  We instantly connected.  We both know the heart wrenching loss of a baby.  When she was 24 weeks pregnant with her fourth child, she was told her unborn daughter wouldn't likely make it to the third trimester, let alone go full term. You can read Amelia's story here.   

Stephanie is an amazing artist and she has turned her pain and grief into a ministry to bless others.  When I met her at Blissdom, Stephanie gave me this necklace.  I love it.  In fact, Sydney has taken a liking to it as well and wants to wear it all the time.


She has a brand new shop on her blog.  It's filled with beautiful necklaces and paintings.  This is another one of my favorites.  It's entitled "Gone Too Soon".


"Reaching Out" would be beautiful hung in a delivery room, don't you think?  This painting celebrates the beauty of pregnancy and bringing forth life.


She also donates her Art Cards to hospitals for their memory boxes they give to grieving families after they have lost a baby.  If you know of a hospital that would love to include some of her artwork, please contact steph@beyondwordsdesigns.com  I know that I was so glad that I received a box for both of my babies when I left the hospital.  It was something tangible I could hold on to. 

If you know someone who is pregnant, Stephanie's art would make an amazing shower gift.  She is offering free shipping and a special surprise gift on all of her necklaces if you order before April 30th.  It would make a wonderful Mother's Day gift.  There are so many great prints it will be hard to choose. 

We have a winner!

I apologize that this is a day late.  I was super busy yesterday with this precious little girl.  She turned five and we had 13 little girls over at the house to celebrate her birthday, Fancy Nancy style.


I had my helpers pick a winner.  Watch the video to see who won.


If you are the winner, please email me your address at hopeinthewaiting@gmail.com  Congrats!!  Thank you again to the wonderful people at Simple Human.  Check out their amazing products online or at your local Bed, Bath and Beyond.

P.S. I apologize for chomping gum on the video.  I didn't realize it until I watched it back and I couldn't do it over.  Oops.  Lesson learned.

Spring Cleaning: Laundry Room

The last room we are going to organize in this series is the laundry room.  I organized and redecorated my laundry room at the end of last year, so I am not going to have any before pictures unfortunately.   

There are so many great organizational items for the laundry room these days.  I'm going to show you a few of my favorites.


The white accordion clothes hanger you can get at Bed, Bath and Beyond or the Container Store.  I love that it folds flat against the wall when I'm not using it.  I hand alot of Brian's cycling clothes I don't want to dry in the dryer.  The coat hook I use for items that need to be repaired or ironed. Tip 1: Use your wall space.


The ironing board and iron wall organizer I have had for years.  It's great, except I had to buy a new iron and my new iron is too big for the holder.  :(  I also have a space under the sink where I can store things if need be.  I added the skirt (a table cloth from Target) to add some color and hide anything I wanted to put underneath it.

This cart fits perfectly in between my washer and dryer.  I love it.  You can find it at Bed, Bath and Beyond as well.  It's on wheels so it's easy to move.  Once again you can see my love for glass containers.  I have all of my soap in see through containers so I know when I am running low. Tip 2: Put all of your detergent and other cleaning supplies in glass or plastic containers.
~
One last tip and it's an important one.  Make sure you clean out your lint trap every time you
dry a load of clothes.  Once a year I pull the dryer out and clean the hose out at the back of the dryer.  If you never clean it out, you are at risk of a fire starting.  I've been thinking about getting a Lint Lizard to help me with this task.  Do any of you own one of these?  If you do, please let me know how you like it.  It's also available at Bed, Bath and Beyond.
I believe a laundry room can be pretty and functional.  Let's face it, you spend alot of time washing clothes, you might as well enjoy it.

You have one more day to enter to win the Simple Human automatic soap dispenser.

Don't forget to check out Broccoli Cupcake's blog for her homemade detergents and other green solutions for the laundry room.

Spring Cleaning:Organizing your Bathroom


We are half way through our series and today we are going to take on the master bathroom, but this will work in any and all of your bathrooms.  Here are the supplies you will need.


In our bathroom there are two narrow closets.  They are kind of a waste of space, but they are there so junk starts to pile up.  This is my closet in the bathroom.


And this is Brian's closet.


Then I tackled the drawers and the space under the sink.


I then brought everything out into our bedroom and laid it on the floor.


Step 1: Look through your medications, make up, etc for expiration dates.  I had quite a bit of stuff that had expired and needed to be thrown out.  Remember don't flush meds down the toilet.  They get into our waterways and pollute the water.  You can take them into most pharmacies and they will dispose of them for you.

Step 2: Put like items in their own bins.  I already had bins, but if you are starting from scratch you will need to make a list of the bins, along with their sizes, on the pad of paper I showed you at the top.

Step 3: Label the bins.  You can use a label maker if you have one or purchase stick on labels if you prefer.

Step 4: Now is a great time to go through your towels and see which ones need to be retired.  If they are still in good shape, you can donate them to a local homeless shelter.

After Photos:


I have a bin for cold meds, first aid, travel size items and dental supplies.  The travel size container is a new one for me, but I think it's going to come in handy.  It will save me a ton of time not having to run to the store the night before a trip for something I need.

I like to stock up on shampoo and conditioner when it's on sale.


I ended up with 2 grocery bags of trash and recycling and a small box of items to donate.  I bought Qtips and toothpaste in bulk at Costco so I decided to donate some of them to our local homeless shelter.  I mean who really needs 600 Qtips anyway.


I have no idea why a Nintendo DS was in our bathroom closet. Ha.  I guess you never know what may turn up.  This obviously needed to go elsewhere in the house.

GIVE AWAY ALERT:  I'm excited to announce that the great folks from Simple Human have agreed to give away one of their sensor pumps.  You may have seen my trashcan in yesterday's post of my pantry.  I love Simple Human products. 

 I was given this sensor pump at Blissdom this year and I absolutely love it.  We use it in our main bathroom and it rocks.  I had a glass soap dispenser that I loved, but it always got clogged.  It was awful.  Soap would be all over the sink and the girls would have trouble getting the soap out.  I brought this pump home and the girls love washing their hands now.

You have 3 chances to win.
1. Go like simplehuman on Facebook.
2. Follow @simplehuman on Twitter
3. Leave a comment on my blog as to where you would use the sensor pump if you won.

I will pick a winner at random on Saturday.  Good luck!

Don't forget to check out Calie's blog to see her green cleaning products and how she used them to get her bathroom sparkling clean.  I know I can't wait to try some of her recipes.

Spring Cleaning:Decluttering your Office

I hope you all enjoyed yesterday's post of my pantry makeover.  I hope it inspired you to start organizing your own home.  I don't know about you, but I am so glad Spring is here.  As I type this the sun is shinning and I can hear the birds chirping outside.  We discovered a birds nest on our front porch and the girls were so excited.  New life is beginning again and that makes me happy.


Today I will be tackling the office.  Our home office is to the left as soon as you walk in the door.  It has 2 french doors, so it's important for me to try to keep it clean and organized.  It's one of the first things you see when you walk through the front door.  Plus, it's very hard to be productive in a messy office. 

This makeover can take a few days, depending on the state of your office. Don't rush it.  Take your time. Maybe you have a smaller office or you just have a desk in the kitchen. Wherever you get work done, it probably needs a little spring cleaning. I'm going to give you some steps today to help you tackle the clutter.

Before Photos:


Yes, that's a baby grand piano in our office. It's has since been moved up to Indiana to my sister in law's house. I loved it, but it gives me so much more space.


Look at my sweet Brooklyn peering behind the piano.  Did she distract you from the mess on the desk and bookcase?  Awful, right?


The storm before the calm. 

Step 1: Like we did yesterday with the pantry, you want to clear everything out.  For me I started with the bookcase.  I took everything off and put it on the floor.  I will be honest and say that the stacks and stacks of books and knick knacks stayed on the floor for a few weeks.  I love organizing, but I got overwhelmed.  I worked on it little by little. 

We have a ton of books.  Brian is an avid reader so we have well over 300 books easily.  I made 3 piles: Keep, Store, Donate.  The keep pile of books went back on the shelves or behind the doors at the bottom of the bookcase.  The stored pile went downstairs in our guest bedroom on a bookshelf.  Finally, I took the donate pile to our local library.  If they can't use them, they sell them to raise money to buy more books.

After photo:  Arranging books shelves is not easy.  Holy cow.  It's still not really finished.  I think I need an interior decorator friend to stop by and help me.


Step 2: Use your wall space.  I made this bulletin board with an old frame and some fabric.  I will write a future post on how you can make one at home.  It was super easy.  I think function can be beautiful.  I keep my blog calendar, my list of when my bills are due and other things that inspire me.


I saw this Aluminum ticket holder, like they use in restaurants, in Martha Stewart's January issue of her magazine. I am going to order one for the wall to hold documents that I need to see on a daily basis. It will help me keep the clutter off the desk.  You can order one here for under $8.
Step 3:  Contain it all.  Once again, pull everything out.  Assess what needs to stay, what needs to be tossed and what needs to be stored in another part of the house.  Once you've done that, then it's time to put it all back in an orderly fashion so it stays clean.  You can find these drawer organizers anywhere.  A great place to start is an office supply store.

Like we did in the pantry yesterday, storage boxes are key.  This is one type of cardboard box that I don't mind having in the house.  These are inexpensive and from my favorite store, IKEA.  They are all labeled so I know where to go when I need to find something.

I keep all of your magazines in these magazine holders from IKEA.  It's hard to tell from the photo but they have a really neat texture to them.  Almost like a burlap.  Oops, I still need to label them.


Contain your bills and receipts.  I took this picture off of Pinterest.  Emily blogs over at Cupcakes and Cashmere.  She has a great office that I adore.

Here is what mine look like.  The box with the lid is Brian's and the one in the crate is where I store all of our bills.  It's jammed pack right now.  I need to go through it from 2011 and get stuff ready to shred.  Alot of places will have a free shred day.  Lowes does it here in town.  They have a company in their parking lot where you can take your bags of papers to shred.  I've done this before and it saves me a ton of time.


After Pictures:


As you can see, I made a spot for the girls to draw and do work when I'm in the office.  It works out great.  We can still be together when I need to get some work done.  Sadly, they are outgrowing the table and chairs, sniff sniff.  I'm going to get them something bigger so they have more room.  This is a great set up if you have toddlers or preschoolers.  It's inexpensive too.  The table is called a Lack table from Ikea (under $10) and the chairs are from there as well ($15 each).


Don't forget to go visit my friend Calie over at Broccoli Cupcake for her green tips on keeping your office clean.

Spring Cleaning: Simple Steps to an Organized Pantry

I am so excited about this series.  I get to partner up with my dear friend, Calie over at Broccoli Cupcake.  I'm going to be tackling the DeClutter part of the series and Calie will be handling the Deep Clean part.  We'll both touch on ways to be green around your home.  We thought the first day of Spring would be a great day to start.  We hope you enjoy it.


Let's start in the pantry, shall we.  I am going to give you simple steps to organize your pantry.  This can be an overwhelming task for anyone.  Whether you have a small pantry or a big one, these steps will help you create a more organized pantry, saving you time and money.

At our last home, our pantry was tiny.  It was not a walk in pantry like the one we are blessed to have now.  So I know what it's like to not have alot of storage.  You need a well organized and labeled pantry to stretch your space and make it work harder for you.  

Step 1: Start off with a clean kitchen.  This will help you be less stressed, as well as provide you with the necessary counter space you will need.

Step 2: Grab a piece a paper and a pen to jot down notes.  This is a great time to make a shopping list of the containers you will need.  You should note the size of the containers you will need for each item.

Step 3: Grab three plastic bags; one for trash, one for recycling and one for donations.  (I stocked up on organic tomatoes at Costco when they were buy one case, get one free and there is no way I will use them all.  This is a great time to take them to a food bank and bless someone else).

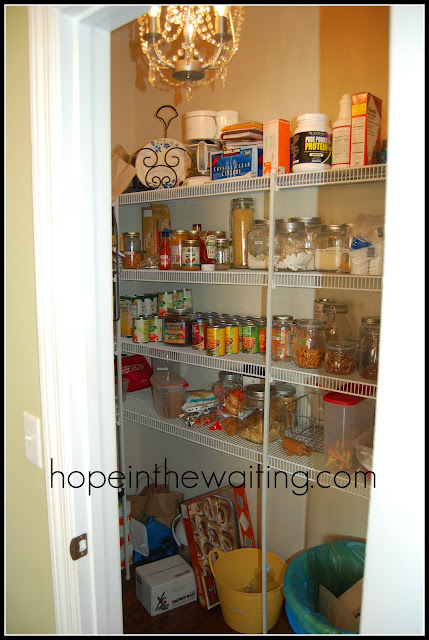
Without further ado, the Before pictures.  These picture makes my blood pressure go up just looking at them.  I'm an organizational freak, by nature, but having kids has forced me to calm down a little.  Anyone who has been to my house lately knows how messy it can get.  This is just one example.  I was so glad I had a deadline to organize my pantry because it forced me to get it done.

Before:


Step 4: Take everything out of the pantry and spread it across your counter tops.  You may need to bring in an extra table if you run out of room.  (The other half of my pantry is on the kitchen table out of view).  This is the best way to see everything you have.  You will be able to discern what you need to keep and what you need to throw out.  You can also take stock in the containers you need to buy.  Maybe you have some Ball jars you can use or if you're like me, you can reuse peach jars.  See all the jars with the green lids?  Those are peach jars I buy in bulk from Costco.  After we eat the peaches I throw the jars in the dishwasher, peel off the labels and I have a great jar to store my drygoods.

Step 5: Remove items out of their cardboard boxes and put them into see through containers, preferably glass, but BPA free plastic will do. My husband laughs at me because I detest cardboard boxes. For one, they are just ugly and two, you can't see how much of the food you have leftin them. This is a time saver as well.  I'm sure there are those of you who have gone to reach for that morning bowl of cereal only to find the box empty. If it's in a glass jar or clear container, that won't ever happen.  The other plus to these types of containers, is that your food usually stays fresher longer than in a box, saving you lots of money.

After:


Step 6: Use your wall space.  This is prime real estate that so many forget to use.  As you can see I have my plastic grocery bags, my aprons, a can crusher (which we never use anymore since we stopped drinking sodas.  Anyone want it?) and all of my tin foil and plastic wrap.  You can find these products at The Container Store or Bed, Bath and Beyond.


Step 7:  Label, Label, Label.  Oh this is the best part.  You see, I know what is in each of these containers, but my sweet hubby wouldn't know flax seed from Chia seed unless it's labeled.  You don't even have to have a label maker anymore. Have you seen Martha Stewart's new line of labels at Staples?  Oh my word, devine.  I went the other day and I was drooling over all of her beautiful labels. In fact, I think I might replace my boring labels for her chalkboard labels.  I love the look!

marthastewart.com


We have a walk in pantry so I have room for my recycling.  This makes it convenient to have it in the kitchen where most of the paper, cardboard and plastic happen.  We live in a town where you can throw all of those items in one blue bag and take it to the curb for pickup.  It makes it so nice.  We have cut down on our trash, well over half, in the last 5 years we've been recycling.
Curbside does not pick up glass, so I have a separate bin to hold the glass.  I take it to my local recycling center.

I love these glass jars.  They are from IKEA, one of my favorite stores on the planet and I so wish they would come to Nashville.  If someone from IKEA is reading this, please, oh please come to Nashville.  You would make me so happy.  True Story: When we were in Orlando in January, I made sure we had time in our schedule to visit the local IKEA.  These bad boys were wrapped and wrapped and wrapped in paper, and my clothes, to ensure they survived the plane trip home.  Thankfully, as you can see, they made it just fine.

I love the containers with the silver lids.  They come in 3 different sizes and you can find them inexpensively at Target and Walmart.

I will leave you with a few more tips.  Tip 1: Always check expiration dates when you are cleaning out your pantry.  I found a few cans of beans that expired last year, as well as some spices that dated back to 2007.  That goes to show you what kind of cook I am.  Tip 2: Keep a shopping list inside the pantry where it's convenient.  As you are cleaning and organizing, mark down the items that you need to stock up on.  My friend Kelly, at Faithful Provisions, has a pantry inventory list you can print out.  Tip 3: Last but not least, this is a perfect time to wipe down the walls, floor, the trashcan and the shelves.  I simply used a wet rag with a spray bottle of vinegar and water. 

Hop on over to Broccoli Cupcake and my friend Calie will show you how you can replace some of the items in your pantry for a healthier way of eating.
Are you ready to get started?  Leave me a comment with your blog address if you have a pantry you are proud of.  I'd love to see it.  Stay tuned tomorrow as I tackle the office tomorrow.
 

Design by Custom Blog Designs/FreeStyleMama Creations